

I’m a recent convert to Elementor (disclaimer: links to Elementor are affiliate links; I earn a commission if you sign up for a plan). While I initially began using it to build out landing pages, I soon realized it was a fantastic tool for designing entire WordPress sites. Most of my sites now run off of Elementor.
However, Elementor isn’t without its limitations. For example, the data you can add to a single post page can be somewhat limited. Fortunately, using WordPress shortcodes and the Elementor shortcode widget, you can add pretty much any data you need to an Elementor page quickly and easily.
The Problem: Adding Feature Image Captions and Translator Data
When I created a new single post page for Unseen Japan recently, I realized two things were missing that I deemed essential. The first was the featured image caption. I use the caption on Unseen Japan to identify the source of feature images. This is important to show that we’re properly licensing the stock images we use. However, it’s also important as the site commissions custom art for some of its articles. The feature caption lets us give the illustrator proper credit and link to their social media accounts.

Another reason I wanted to add dynamic data to our Elementor pages was for translations. UJ occasionally translates pieces from Japanese. In those cases, it lists the author as the original author — but I also wanted to call out the translator and recognize their efforts as well.

Dynamic Data With Shortcodes
Fortunately, adding these required little work. The trick was using WordPress shortcodes.
WordPress diehards know that Shortcodes are basically macros — code in between a set of brackets with zero or more dynamic parameters passed in. Shortcodes enable easily adding dynamic functionality to content in WordPress.
While commonly used in the body of posts, Elementor also supports a Shortcode Widget. This means that we can define our dynamic data as shortcodes and easily add them to our Elementor design!
Defining Shortcodes
Let’s see this in action. Try this out on your own site.
First, let’s define our first shortcode — the featured image caption shortcode. To do this, we’ll place the following code in our functions.php file. (Remember: If you’re using a template that someone else created, create a child theme first.)
function site_get_feature_image_attribution() {
	return "<span class='uj-fi-attr'>" . get_post(get_post_thumbnail_id())->post_excerpt . "</span>";
}
add_shortcode('fi_attr', 'site_get_feature_image_attribution');
This code is pretty straightforward. The function site_get_feature_image_attribution() returns the featured image caption. If the code looks a little weird, remember this is because WordPress stores feature images as posts in its database. The feature image’s caption is stored as the post’s excerpt property – hence the calls to get_post and post_excerpt.
The function add_shortcode() defines our shortcode for us. It takes two parameters here: the name of the shortcode we’ll use in our Elementor template and the name of the function we just defined. This tells WordPress to execute that code to evaluate the shortcode.
Our second shortcode’s a little more involved — but not much. For posts that are translated, I define a custom metadata element called translator_user on the post. The shortcode checks to see if translator_user is defined on a post. If it is, it returns the author’s name and a link to their author page.
function site_get_translator_info() {
	$translator = get_post_meta( get_the_ID(), 'translator_user', true );
	if ($translator != "") {
		$userdata = get_user_by("login", $translator);
		return "<span class='uj-translator'>Translator: <a href='/author/" . $translator . "'>" . $userdata->display_name . "</a></span>";
	}
}
add_shortcode('translatorinfo', 'site_get_translator_info');
You’ll notice I wrap both elements in a span with a CSS class defined. This will let me apply styles to the element in Elementor.
Adding Shortcode to Elementor Template
Now the easy part: adding the shortcodes to the template. In the Elementor editor, search for “shortcode” in Elements.
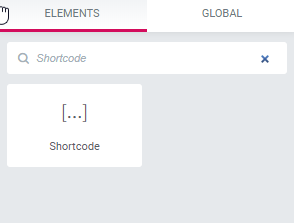
Drag and drop it to the desired location. Then, in Edit Shortcode, add the name of the shortcode. Make sure to include the brackets. Then, click the Apply button.
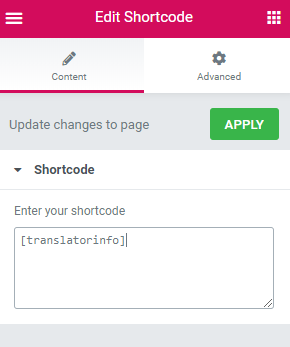
Elementor will refresh the page and you should now see your shortcode.
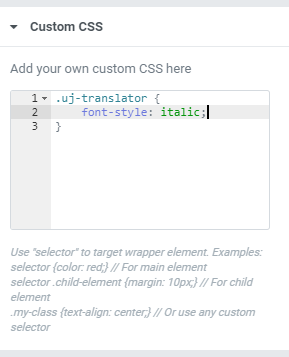
Applying a Style
To apply styling to the text returned by the shortcode, in Edit Shortcode, go to Advanced->Custom CSS. Elementor provides a mini-CSS editor that lets you apply styles to the current element. In this case, we set the class uj-translator to render as italic.
And that’s that! With just a little custom PHP code, we’re able to add new metadata to all of the site’s posts in Elementor. This is a ridiculously helpful trick that can be used to render all sorts of dynamic and conditional content on your posts, creating a rich experience that adds to Elementor’s great out-of-the-box templated designs.
Not an Elementor user yet? Sign up and get started for free and try it for yourself! I promise — it’ll change the way you WordPress.